Showing posts with label tips. Show all posts

23 March 2014

Work Smarter, Not Harder

First off--hello! This is me, knocking the cobwebs out of the corners of my all-but-abandoned blog. :) Lots has happened since I last posted, but for the most part, I've simply been slacking in the blogging department because it's just easier to cook without taking photos and notes about recipes. Sorry! Forgive me? ;)


Ok…so, it's no major secret that we eat a ton of fruit around here, and that pineapple is no exception to that. In fact, we almost always have a pineapple or two laying around waiting to be cut--we munch on it, I serve it with dinner, and I even incorporate it into lots of breakfast, dinner and dessert recipes.

All that said, it's such a pain in the butt…I often spend 10-15 minutes neurotically trimming one, only to watch it basically vanish in less time than it took me to cut it up. However, I had a lightbulb moment a few months ago! I have always used my teeny tiny little biscuit cutter to cut out the core after I've trimmed and sliced the pineapple. I am not sure why it never occurred to me before…but the larger biscuit cutters are perfect for trimming off the skin!


Simply slice the pineapple into 1/2-3/4 inch disks, choose the largest one that will fit inside the skin, and press (or pound) them through the pineapple!


So easy peasy--today I cut up 3 whole pineapples and it took me about 5 minutes total. :)

14 July 2012

Yet Another Tip

I slack, I know.


I have a few quick recipes to put up, but in the meantime, here's another tip....

I've always shredded cheese on top of a paper towel or directly onto my counter top or into a bowl or onto a plate, etc. But then I discovered pan lining paper....and this stuff is awesome. It doesn't tear under my box grater like foil or plastic wrap....and you can wrap up and store the leftovers right in the sheet you shredded the cheese onto, and there's literally *NO* mess to clean up. :) I cannot express enough love for pan lining paper. :)


23 June 2012

Another Tip...

I promise I'll have a recipe up in the next few days (maybe tonight if we don't eat out?), but in the mean time, here's another little tip.

You remember my post about my kitchen sponge, right? As awesome as that tip is...and I do still use that for the sponges for my dishes....this one is a little more useful. :)

I love this. If your kitchen is anything like mine, you are constantly gathering miscellaneous sponges and scrubbies and whatnot behind your faucet. I know I am. That's just where they seem to collect and multiply. SOS pads, Magic Eraser bits, bottle brushes, old dried up sponges, etc. They all land behind my kitchen faucet never to be used again. This is up there with my biggest pet peeves, actually. This grody mess drives me absolutely out of my mind and I am forever cleaning that catch-all spot out.

A couple months ago, my husband brought me some gorgeous flowers, and I pulled a vase out from under my sink to stick them in. When they died, I washed the vase and put it on the back of my sink to dry since I didn't put it in the dishwasher with the rest of the dishes from that load. Well, it took me a couple days to get around to putting it away, and when I went to put it away a few days later, my husband had conveniently (lazily? inconsiderately?) tossed my bottle brush and an SOS pad into it.

At first, I have to admit, I was irritated. That was a CLEAN vase, and now I would have to wash it again before I put it away. But then I thought about it.....I kind of like the idea of a "pretty" spot to stick all of this kitchen sink clutter. So instead of whining about it (haha!) I just tossed the rest of my clutter into it.

Ever since, I have no clutter behind my kitchen faucet. And even better? All those little bits of leftover Magic Eraser and SOS pads and whatnot? They actually get tossed into the trash because I don't want them in my vase! haha!

I figure sacrificing one of my favorite vases to use as a pretty clutter catcher is better than the grody mess behind my sink, right? :)

So...this tip totally goes to my husband for not thinking and dirtying my clean vase. LOL!


18 June 2012

"Produce Insurance"

So since I'm not cooking much beyond throwing something on the grill these days, I thought I'd offer up a few little "tips" I have up my sleeve.

The first tip I have is about produce, and "protecting your investment," so to speak. I don't know about everyone else, but I spend a *LOT* of money on produce--a good 30-40% of my grocery budget, if I had to venture a guess. However, I am forever throwing things out because I forget I have them! I have tried keeping a list of what I have on the fridge and crossing things off as I use them, etc....it works, for about 2 weeks and then I get lazy and tell myself that I *WILL* remember I bought xyz because I'm gonna make this one recipe with it....and wouldn't a know it, 2 weeks later I find $10 worth of xyz sitting in the bottom of my produce drawer, soggy and gross. :(

My solution to this started off easy enough. Do not refrigerate anything that doesn't *HAVE* to be refrigerated or if I do not intend to eat it cold. If it's not refrigerated in the store, I don't refrigerate it at home. I take it out of the bags from the store and arrange my produce in pretty bowls or just along my countertop. I find that the produce I leave on my kitchen counter gets USED. Imagine that! ;)

A couple months ago, I was cleaning out my refrigerator. I pulled the drawers out, scrubbed them down and scrubbed underneath it. As I oooooh'd and aaaahhhhhhh'd at my newly sparkling clean refrigerator, and all the space down there, I thought that it was a shame that I had to reassemble everything and hide it. So I didn't assemble it right away. I put it off till the next day, and just neatly stacked the groceries that needed to be put back there in the bottom of my fridge. Well, one day led to three, which led to a week. After a week of using the bottom half of my refrigerator "open"....I decided I didn't want to put the drawer assembly back. So I put them away in my garage (seeing as how this is a rental house, I couldn't very well just toss it...).

After a couple weeks, I decided to buy some plastic baskets that can easily be washed and a wire shelf to put down there to replace the drawers, and I'm using the baskets in my fridge the same way as I do the ones on my counter top--take the produce out of the plastic sacks from the grocery store and arrange them, "bare," in the fridge.

Guess what? Not only does my crappy little rental house fridge look AWESOME, but I am not throwing away *NEARLY* as much produce because I actually *SEE* it every time I open the fridge.

I'm calling this little experiment "Produce Insurance." It's awesome! :)

15 November 2011

Opening a Pomegranate

'Tis the season that I start craving pomegranate! I used to be really intimidated by cutting into them, but it's really not too difficult or even messy if you go about it properly.

You'll need a mixing bowl, a sharp knife (I like my serrated tomato knife for this) and I'd recommend a trash bag to cover your cutting board or counter top as well, because the juice *WILL* stain, I promise.


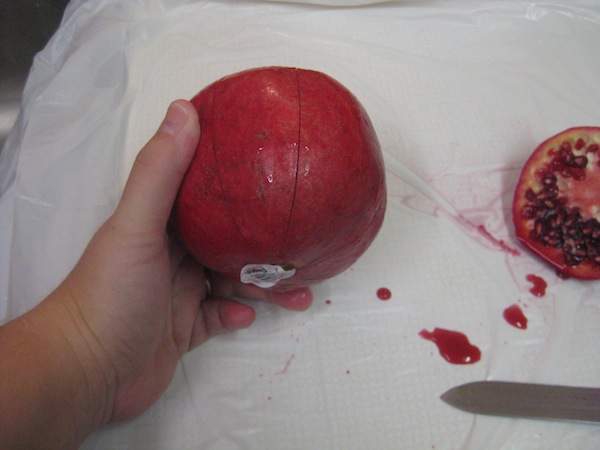
Start by lopping off the top--about half an inch or so.

See the juice?!

Score the side from top to bottom about half a dozen times, give or take (at least 4 times).


Fill your bowl with cold water, and then break the pomegranate apart into the water. It should come apart pretty easily where you've scored it.


Then, all you have to do is get to work gently picking the little pearly bits out, letting them fall into the water. The fruit will sink, and the icky white part and skin will float to the top.


All you have to do from this point is skim all the white pith off the top of the water, and strain it and you will be left with about a cereal bowl full of pomegranate seeds/pearls/whatever you wanna call them to use however you want. My favorite is to just eat them as-is by the handful, but you could put them in salads, juice them, make jam, make grenadine, or any number of other things.


I store them in a bowl in my fridge wrapped in flour sack cloth.


14 November 2011

My Kitchen Sponge


I cut a chunk out of my kitchen sponge so it can sit up off the counter and actually dry after each use. I don't remember where I saw this idea, but I liked it, and it works really well!!! Just cut a bigger chunk out of your sponge and you can stick it around the neck of your faucet. :)

22 July 2011

Ya know how to make a great breakfast sandwich awesome? Smear the bread with maple butter (mix maple syrup with your butter or margarine), and toast it like a grilled cheese sandwich. I guarantee....awesome, no matter what kind of bread you use, whether it's sourdough or whole wheat, a nice artisan bread or a plain white bread. Awesome. ;)