30 April 2012

Pollo Loco

*Update* I made this on the grill last night and it worked out so much better! Take 4 sheets of tin foil and fold them together so they are 2 wide and 2 thick. Fold up a lip all around, and put it straight on top of the grates on your grill--if you have wire grates with 1" or so spacing like on the top rack pictured below, you might want to make it 3 layers thick; my grates are cast iron with about 1/3-1/2" spacing and this worked perfectly. Spread your charcoal evenly across the whole thing and raise it up almost as high as the charcoal carrier will go. If you have a gas grill, just turn it on as high as it'll go. Add a little bit of oil to prevent sticking, and cook the same way on the grill as you would in the pan, but this way you have a huge surface to work on and you can just throw the mess away! :)


My family frequents this Mexican restaurant in our town, and they make a dish they call "Pollo Loco." It is basically just peppers, onions and chicken charred like for fajitas, and served over spicy rice with some shredded lettuce and a little bit of mozzarella (yes, mozzarella) cheese, tomato and green onions. They serve it with 3 flour tortillas. As simple as it is, it is one of my favorites and I always order it when we eat there. I've been meaning to make it at home for a few weeks now and finally got around to it last night.

Here's what it looked like in the restaurant the last time I ordered it....it came out a little underdone, and kinda greasy...I wasn't real pleased, but it was still pretty yummy. Horrible cell phone pic...sorry....


What you need to make it at home:

Pretend there's a bowl of rice and a can of Rotel in that photo for me, ok?
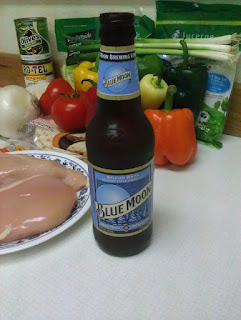
Shredded iceberg lettuce (I'd much prefer romaine, but who am I to argue?), mozzarella cheese (again, I'd think monterey jack would be more appropriate, but even their menu says they use mozzarella, so....), onion, green onion, tomatoes, bell peppers, jalapeno pepper, white chile, poblano pepper, (you could really use any variety of peppers you want or can get your hands on....this is what the Safeway near my house had....so I grabbed one of each), tortillas (flour!), chicken breasts--this is about 1 lb, and you can use thighs if you prefer them.


First things first, this is one of those recipes that you cannot prep as you cook, because if you're anything like me, something will burn before you have the next thing prepped, so wash and slice everything before you even heat up your pan. Snip the green onions with scissors and slice up the tomatoes--and set them aside because you want to add these fresh at the end. I wound up using only half of each of the bell peppers, and half of the onion, because it was a LOT once it was all sliced up, and I wanted to actually taste the chicken. haha! Slice the peppers into thin strips--I quartered the bell peppers and then sliced them across the short way into thin little strips. Fillet or butterfly the chicken and slice it into pieces about the same size as the pepper strips, maybe a bit bigger, but not much.

When everything is prepped and ready to go, season the chicken with salt and pepper, and then heat a couple tablespoons of oil in the bottom of a large heavy skillet (cast iron if you've got it...or even a good dutch oven if you don't have a huge skillet) over medium high heat. A griddle would be awesome if you've got one that goes directly onto the stove, too....but I like sides for stuff like this because I'm a messy cook!

Pour a cup of rice, a can of Rotel, and 1 1/2 cups of water in a saucepan (you could totally add taco seasoning or extra cayenne or hot sauce or whatever you like, but I think the rest of the dish adds more than enough flavor) and cook it like you would normally cook rice--bring it to a boil, throw the lid on, turn the heat down and let it simmer for a few mins. Set the rice aside.

While the rice cooks, toss the chicken into your pan first. Cook it a minute or two until it starts to brown, and then add the sliced onion and peppers. You may need a little more oil, add it as necessary. You want that sizzling sound. Stir and cook it all together until everything is slightly blackened--don't be like me and open a beer and walk away while chatting with your husband....because mine was more than slightly blackened (haha!), but it was still good because I was GOING for that charred taste anyway. No seriously, I was...not at all joking.

Awesome....

When everything is cooked to your liking, plate a spoonful of the rice and spread it out to cover half the plate, then take a handful of the lettuce and spread it on the other half. Toss the green onions and tomatoes with the veggie/chicken mix (yeah I just threw mine on top because I'm the only one in my house that will eat a fresh tomato...house full of weirdos, I tell ya!)--I added olives I found in the cabinet, too--and then spoon the veggie/chicken mix over the rice, along with a handful of cheese. Top with cilantro (that I totally forgot to buy...oops!) and serve with warmed tortillas.

mmmmmm....Leftovers for lunch the next day!!!! ;)


Verdict? Even slightly more charred than I wanted, my version was *WAY* better...and for what it costs to eat it at the restaurant, I made enough for 4 people to have for dinner AND lunch the next day. :D

17 April 2012

09 April 2012

Brined & Roasted Turkey

This is such a basic thing, but it makes all the difference in the world, no matter how you intend to cook your turkey. You can adjust the quantities to your desire, just make sure the ratios remain proportionate. You can add whatever herbs or aromatics you'd like. Traditionalists will recommend thyme, rosemary and bay leaves, but do what you want. Even if you don't add anything else to this, the bird will come out awesome, I promise.

I have a cooler that holds 7 gallons and happens to be the *PERFECT* size for brining 1-2 14-pound turkeys...which was totally a happy accident since I bought it because it's also the perfect size to hold 2 gallons of milk and one bag of ice for road trips (it's a Coleman model 6277 if anyone cares). You could easily do this in a 5 gallon bucket or a massive stock pot, or, well, really anything that the turkey will fit inside completely.

My brine is super simple, and you can omit the beer and just add extra water if you'd like and it'll be just as good.

In a large pot, combine:

6 12-oz beers
1 cup of brown sugar
2 cups of salt (whatever salt you have....I use kosher in my cooking, but I always just buy a 50 cent thing of cheap table salt for this....that is almost exactly 2 cups)
2-3 quarts of water (enough to top off the pot)


Heat over medium high heat until all of the sugar and salt dissolve, then remove from the heat and allow to cool completely. If you are as impatient as I am, you can pour this over a bag of ice right into the bucket/cooler/pot you're going to use.

Pull the pop up thermometer out of the turkey if there is one, rinse well under cold water, and then put your turkey into the cooler breast side down. Add a bag of ice, and then top off with water and stir to distribute the brine. Let the turkey sit in this at LEAST 8-12 hours. Usually, I buy a frozen bird and I let it thaw in the brine. This saves me room in my refrigerator, and it gives the bird extra time in the brine solution. :) Win-win! Just make sure you check at least once a day and add ice as needed, to keep everything cold. Luke warm water + poultry is not a good idea. ;)

When you're ready to cook your bird, preheat your oven to 500 degrees. Pull it out of the brine and rinse it off, inside and out. Pat it dry and put it on a rack inside a roasting pan. Smear the outside with real butter (you could certainly whip your butter up with some fresh garlic paste and use that for extra flavor) and put stuff loosely inside as desired (note: NOT STUFFING. STUFF. Onions, garlic, carrots, celery, apples, orange peel, whatever...but under no circumstances dressing...It will not cook evenly and will just make a huge yucky mess). Put extra 'stuff' in the bottom of the roasting pan and add about a quart of chicken stock (or turkey, if you happen to have it in your freezer...I never do). Just make sure the bottom of the turkey is not touching the liquid--you can add more stock as necessary throughout the cooking process if you find all of the liquid has evaporated. You can just as easily use Better Than Bouillon and hot water, too. ;) 

Throw the bird into the 500 degree oven, close the door and walk away for 30-45 minutes. Do not look at it. Do not, under any circumstances, open the door. After 30-45 minutes, turn the heat down to 350, pull it out, baste it really good with the liquid in the bottom of the pan, and then tent the breast only with foil. Put the bird back in. Every 30ish minutes, go back and baste it again.

Using a probe thermometer (available at Walmart for like $3....don't skimp), take the bird's temperature in the thickest part of the thigh, between the thigh and the body of the bird. When it reads between 155 and 160 (should take roughly 2-3 hrs for a 13-15 lb bird), pull it out and cover the entire turkey tightly in foil. Its temperature will continue to raise and the juices will distribute it will be perfect and ready to eat after about 20-30 minutes.